
Old Richmond homes have soul. Thick plaster walls, tall windows, and trim you just can’t buy anymore. But there’s a catch. Most of these houses were built long before central air, so there’s no ductwork hiding inside the walls. That leaves one big question for owners of these beautiful older homes.
How do you cool and heat a historic house without tearing it apart? The answer, most of the time, is a ductless mini-split. It’s a small, quiet system that handles one room or the whole home. The tricky part is hiding the refrigerant lines and saving that original plaster. I’ve done this work across Church Hill, The Fan, and Jackson Ward, and today I’ll show you exactly how it’s done here in Richmond.
Why Ductless Mini-Splits Fit Richmond’s Historic Homes So Well
A ductless mini-split has two main parts. One sits outside your house – that’s the outdoor unit. The other hangs inside on a wall, called the indoor head. A skinny bundle of pipes, the line set, connects them. No big metal ducts. No giant holes in the ceiling. Just a small path for the refrigerant and wires, which is why these systems work so well in homes with no ductwork.
Here’s the real problem with Richmond’s historic houses. Adding a central air system means ripping open walls and ceilings to fit ductwork. That destroys plaster, trim, and original details you can never replace. A mini split skips all of that mess. Each indoor head cools its own zone, so you only heat and cool the space you actually use. Want the basics first? Our guide on how ductless mini-split systems cool a Richmond home breaks it down in plain words.
One outdoor unit can feed many heads. Some models run five to eight indoor units at once, so you get whole-house comfort from a single piece of equipment. Old ducts, when a home even has them, leak and waste air. Skipping ducts skips that waste completely. For a historic home, that’s a win for your wallet and your walls at the same time.
| Feature | Central Ducted AC | Ductless Mini-Split |
|---|---|---|
| Wall/ceiling damage | High (ducts need big chases) | Low (one ~3-inch hole per head) |
| Best for | Homes with existing ductwork | Older homes with no ductwork |
| Zoning | One thermostat, whole house | Room-by-room zones |
| Plaster risk | High | Low |
| Efficiency | Loses air to duct leaks | No duct loss |
The table makes the choice clear. For a modern build with ducts already in place, central air is fine. For a Richmond house with plaster and no ductwork, ductless is the gentle path. You keep the charm. You gain the comfort. And you skip weeks of dust and drywall repair.
First, Let’s Talk About Your Plaster (And Why It’s Worth Saving)
I’ve handled cases exactly like this many times. A homeowner calls in a panic because a past crew cracked a wall while drilling, and now the plaster is spider-webbed with cracks that spread every season.
So what is plaster? It’s the old-school wall finish. Workers spread wet lime or gypsum over thin wood strips called lath, and it dries rock hard. Most Richmond homes built before the 1950s have it. It’s beautiful and solid. It’s also brittle. Hit it wrong and it cracks in a web you simply can’t hide with a little paint.
Saving plaster isn’t only about looks. It keeps your home’s structural story and a big part of its value. Preservation matters in areas like Monument Avenue and Church Hill, where buyers pay for original features. Swapping a whole wall for drywall changes the feel of the house. And honestly? Good plaster is quieter and more solid than most new drywall.
This is the real reason ductless wins here. We make one small, clean hole for the line set instead of many big cuts for ductwork. The hole we drill is usually about 3 inches wide – no bigger than a soda can. Smart placement keeps drilling away from fragile spots and old cracks. If you’re nervous about your walls, our team can check the plaster first and plan a path that keeps it safe.
What Is a Line Set? (The Simple Version)
A line set is the bundle that links your outdoor unit to the indoor head. Think of it as the system’s lifeline. Inside that bundle are two copper pipes, a small wire, and a drain hose. The copper pipes carry refrigerant, the special fluid that moves heat in and out of your home. The drain hose takes away the water the system pulls from the air.
Left bare, a line set looks like a fat white tube stuck to your wall. On a plain building, maybe that’s fine. On a historic Richmond home with pretty brick and trim, it sticks out badly and cheapens the whole look. That’s why hiding it is the entire game. A good hide makes the system almost disappear, while a sloppy one makes your classic house look patched-up.
Here’s what’s actually inside that bundle:
- Two copper pipes that carry the refrigerant back and forth
- A control wire that lets the indoor and outdoor units talk to each other
- A drain hose (the condensate line) that removes water the unit pulls from the air
- Insulation wrapped around the pipes to stop sweating and protect efficiency
How We Hide Line Sets Without Wrecking the Walls
In my professional experience, hiding the line set is where good crews and bad crews split apart. I’ve seen lazy runs slapped straight across a front porch, and I’ve seen clean runs you would never spot in a hundred years.
The trick is to use paths the house already gives you. Old homes are full of hidden roads – closets, chimney chases, basements, and crawlspaces. We follow those instead of cutting brand-new ones. The goal stays simple. Get the line set from the indoor head to the outdoor unit with the least damage and the least visible pipe.
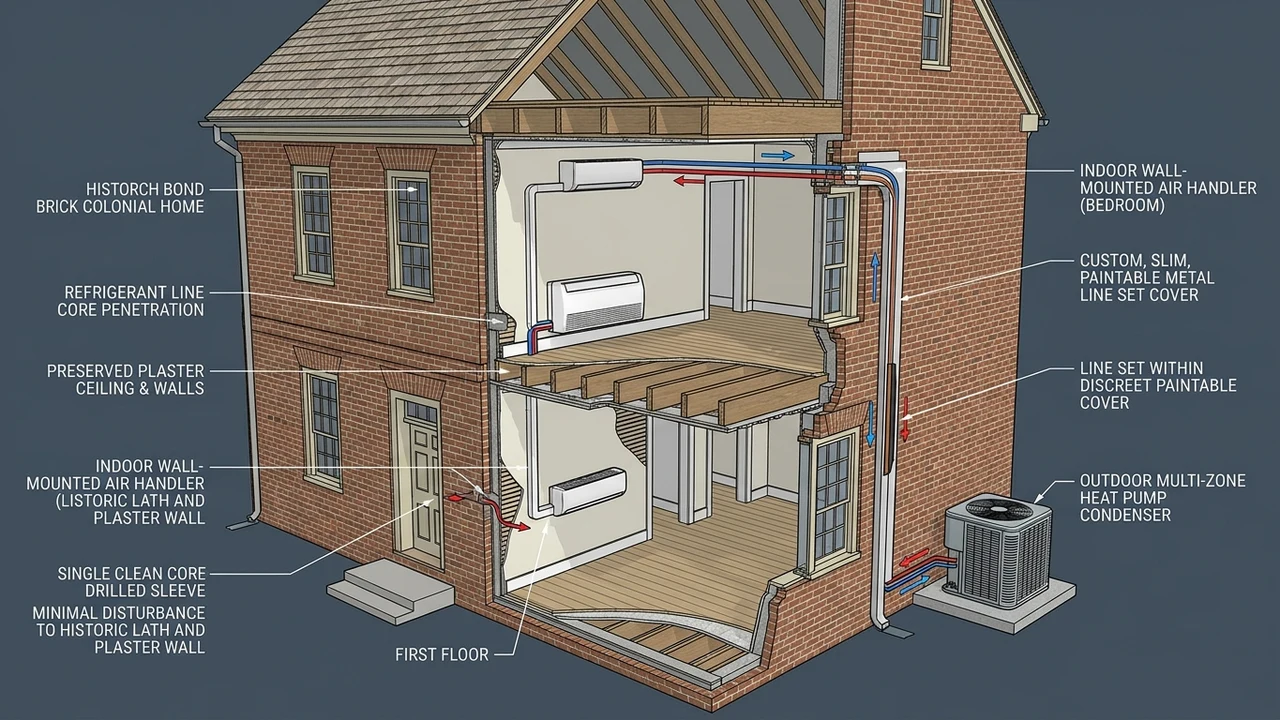
Here are the main ways we conceal the line set in Richmond historic homes:
- Interior chases and closets: We run the line down through a closet corner or an old chimney chase, fully out of sight.
- Basements and crawlspaces: We drop the line below the floor, then run it sideways to the wall nearest the outdoor unit.
- Back-to-back mounting: We place the indoor head right on an exterior wall, so the line pops straight out – the shortest, cleanest run.
- Paintable line-hide covers: When a short outdoor run shows, we use a slim cover and paint it to match the wall or trim.
- Through mortar joints, not brick faces: On brick houses, we drill the soft mortar, never the historic brick. Mortar can be repaired; brick cannot.
| Routing Method | Best For | Plaster/Facade Impact |
|---|---|---|
| Closet or chimney chase | Upstairs bedrooms | Very low, fully hidden |
| Basement or crawlspace run | First-floor rooms | Low, hidden below the floor |
| Back-to-back mounting | Rooms on an exterior wall | Lowest, shortest line |
| Exterior line-hide cover | When no inside path exists | Low, paintable to match |
Where the outdoor unit sits matters too. We tuck it beside the house, behind a shrub, or in a side yard – never front and center. Keeping the line set short also helps the system run better and last longer. Most makers want runs under about 50 feet for the best efficiency. If your layout is tricky, this is the exact puzzle we solve week after week around Richmond.
Planning the Job: Sizing, Zones, and Load
Before any drill touches a wall, we plan. The most important step is sizing – matching the equipment to the room. We run a load calculation, which pros call a Manual J. It looks at your room size, windows, ceiling height, sun, and insulation. Then it tells us the right BTUs, which is really just the capacity, or power, of the system.
Getting the size right is huge. Too big, and the system blasts cold air, shuts off fast, and leaves your rooms damp. Too small, and it runs forever and never catches up. In Richmond’s sticky summers, the wrong size means a clammy house no matter what the number on the remote says. A right-sized indoor head holds steady comfort and pulls moisture out of the air.
Next we set your zones. Each indoor head is its own zone with its own remote. You can cool the bedroom at night and leave the guest room off. A multi-zone setup ties several heads to one outdoor unit. We mount each head high on the wall, away from trim and windows, where it spreads air well and stays out of your eyeline.
We also check the SEER2 rating, which measures cooling efficiency. Higher is better. Many ductless systems reach SEER2 ratings in the high teens to over 30, far above an old window unit. Here’s the short plan we walk through before we start any installation:
- Measure each room and count the windows
- Run a load calculation for the correct BTUs
- Pick head spots that protect plaster and trim
- Map the shortest hidden line set path
- Choose the best outdoor unit location
- Confirm any historic district rules that apply
The Step-by-Step Retrofit Process
I’ve seen this pattern many times: the jobs that go smooth are the ones planned down to the inch before day one. Rushing the installation is exactly how walls get hurt.
Here’s how a clean retrofit goes in a Richmond historic home, start to finish:
- Home walkthrough: We look at your plaster, walls, and layout, and talk through where the heads should go.
- Load and sizing: We run the load math and pick the right BTUs for each room.
- Mark the path: We map the hidden line set route and the single drill point.
- Mount the plate: We fix a metal plate to studs, not weak plaster, to hold the indoor head.
- Drill one small port: We bore a single hole, about 3 inches wide, angled down and out.
- Run the line set: We feed the refrigerant pipes, wire, and drain through the hidden path.
- Set the outdoor unit: We place it on a pad or bracket, level and quiet.
- Vacuum and charge: We pull the air out of the lines, then set and check the refrigerant charge.
- Test everything: We run heat and cooling, watch the drain, and confirm each zone works.
How long does it take? A single-zone job often wraps in one day. A multi-zone whole-home installation usually takes two to three days. That’s still far faster than the weeks of mess a full duct system brings. Best of all, your original plaster stays right where it belongs the whole time.
Keeping the Historic Look: Heads, Covers, and the Outdoor Unit
Let’s talk looks, because this is what worries homeowners most. A white indoor head on a period wall can feel out of place. So we place it smart – high on a side wall, above a door, or tucked near the ceiling line. From below, you barely notice it. Some brands even make flatter, cleaner heads that blend into the space better.
Outside, any short run of pipe goes inside a slim, paintable line-hide cover. We paint it to match your siding, brick, or trim so it fades away. The same care goes for the wall port – we seal and finish it so it stays tidy and dry. On a historic home, these small touches are the whole point. The system should serve the house, not fight its style.
The outdoor unit needs air, but it doesn’t need a spotlight. We set it on a side or back wall, then screen it with a low fence or shrubs. If your home sits in a Richmond historic district, there may be review rules about what shows from the street. We plan around those from day one, so there are no surprises later on.
| Look Concern | Our Fix |
|---|---|
| White head stands out | Mount it high, choose a slim low-profile head |
| Bare pipe on the facade | Paintable line-hide cover matched to trim |
| Outdoor unit visible from street | Side or back placement, fence or shrub screen |
| Big wall hole | One ~3-inch port, sealed and finished clean |
Richmond’s Climate and Why It Changes the Plan
In my years servicing Richmond systems, I’ve learned our weather makes its own rules. What works in a dry state can fail here fast.
Richmond sits in a humid, subtropical zone. Summers get hot and sticky, with highs often near 90°F and humidity above 70% as temperatures climb. That damp air is the real enemy in older homes. It makes rooms feel warmer than the number says, and over time it can harm plaster and feed mold. A right-sized ductless system fights back by drying the air while it cools.
Moisture control is a big deal for historic houses. The U.S. Department of Energy notes that a home’s ducts can lose 20% to 30% of the air moving through them, which drags efficiency down (DOE, Energy Saver). Ductless skips ducts, so it skips that loss and keeps damp air under control. Want to understand our sticky season better? Read why Richmond summer humidity makes AC service matter.
Winters here are mild but real, with cold snaps into the 20s°F. Modern ductless units are heat pumps, which means they pull warmth from outside air even when it’s cold outside. Today’s cold-climate heads keep making heat down to around 5°F, easily covering a Richmond winter. If your heat pump starts to struggle, our heat pump repair team can get it back on track.
Costs, Efficiency, and Long-Term Value
Everyone asks about price first, and I get it. The honest answer is that it depends. Cost changes with how many zones you want, the equipment brand, the SEER2 level, and how hard the line set hide turns out to be. A single room costs far less than a multi-zone whole-home plan. I won’t throw out a fake number, because every historic house is different.
Where ductless pays you back is the running cost. Because there’s no duct loss and you only cool the space you use, your bills drop. The U.S. Department of Energy says ductless mini–split heat pumps can be a very efficient choice for homes without ductwork (DOE Energy Saver). A high–SEER2 head sips power next to an old window unit. Over years, that gap adds up to real money saved.

| What Affects Your Cost | Why It Matters |
|---|---|
| Number of zones/heads | More heads means more equipment and labor |
| SEER2 efficiency level | Higher SEER2 costs more up front, saves later |
| Line set hide difficulty | Tricky hidden runs take more time |
| Multi-zone vs single-zone | Whole-home plans cost more than one room |
| Historic district rules | May add a few planning steps |
Think long term. A clean ductless retrofit adds comfort without hurting your home’s charm, and that protects resale value in Richmond’s historic market. You also gain room-by-room control, so you stop paying to cool empty rooms. Pick quality equipment and a careful crew, and the system should serve you for many years. For the big picture, our overview of what heating, ventilation, and air conditioning really means helps.
Mistakes to Avoid in Historic Retrofits
I’ve fixed plenty of botched jobs, and the same errors show up again and again. Learn these few, and you’re already ahead of most homeowners.
Here are the slip-ups I see most in historic mini split work:
- Oversizing the system: Too many BTUs cause short runs, damp air, and wasted money.
- Drilling the brick face: Always go through the mortar, never the historic brick itself.
- Bad head placement: A head over trim or a window looks wrong and cools the room poorly.
- Ignoring the drain: A blocked drain line leaks water and can ruin plaster fast.
- DIY refrigerant work: Charging refrigerant needs training, tools, and often a license.
- Skipping the load calculation: Guessing the load almost always ends in the wrong size.
That drain point deserves extra care. In humid Richmond, an indoor head can pull real water out of the air all summer long. If the drain line clogs, that water backs up and finds your wall. Most of the callbacks I see on mini split jobs trace back to drains, not the equipment itself. A yearly check keeps it clear – our AC maintenance checklist for Richmond homeowners walks you through it.
When to Bring in a Pro (and How to Pick One)
Could a handy person mount a head? Maybe. But the parts that truly matter – the load math, the vacuum, the refrigerant charge, and hiding the line set in old walls – need real skill and the right tools. One wrong move cracks plaster or voids your warranty. In historic homes, the stakes climb higher. This is careful, custom work.
So how do you pick the right crew? Look for licensed, insured techs who know older homes, not just new builds. Ask to see photos of hidden line set runs they’ve done. Ask how they protect plaster and how they route around windows and trim. Our guide on how to choose a heating and air conditioning contractor gives you the exact questions to ask.
If you own a historic Richmond home and want ductless comfort without the damage, let’s take a look together. We can walk your house, map a hidden path for the line set, and plan a system that fits your rooms and your budget. That’s the work we care about most at Richmond Air – protecting the home while we upgrade it. No pushy sales pitch, just a clear plan you can trust.
Final Thoughts
Old homes deserve modern comfort without losing their soul. A well-planned ductless mini–split gives you exactly that. It cools and heats every room, hides the line set out of sight, and keeps your original plaster safe. For Richmond’s historic houses, that’s the smart, gentle path forward.
This careful mindset isn’t just my opinion. The National Park Service, in its guidance on heating and cooling historic buildings, urges owners to add comfort systems with the least harm to original materials (NPS Preservation Briefs). A hidden line set and saved plaster follow that idea to the letter. Take your time, pick a careful crew, and treat the house with respect. Do that, and you get the best of both worlds – old Richmond charm and new comfort. Have you thought about which room you’d start with? I’d love to hear your plan.
Frequently Asked Questions
Will installing a mini-split crack my plaster walls?
Not with careful work. We mount the plate to studs, drill one small port about 3 inches wide, and route the lines through hidden paths. Cracks come from rushing or hitting weak, old spots in the plaster. A crew that knows historic homes plans around those trouble areas and protects your walls.
How do you hide the refrigerant line set on a historic home?
We use paths the house already has – closets, chimney chases, basements, and crawlspaces. Any short outdoor run goes inside a slim, paintable cover that we match to your trim. On brick houses, we drill the soft mortar, never the brick face. The result is a line set you’d have to hunt to find.
Can one mini-split heat and cool my whole old house?
Often yes, with a multi-zone setup. One outdoor unit can feed up to five to eight indoor heads, and each room gets its own zone and remote. We size the system with a load calculation so every space stays comfortable. That way you cool the busy rooms and leave the empty ones off.
Do mini-splits work in Richmond winters?
Yes, they do. Ductless units are heat pumps, so they make heat even when it’s cold outside. Cold-climate heads keep working down to around 5°F, which sits well below Richmond’s normal winter lows in the 20s°F. One system handles both our humid summers and our chilly snaps.
How long does a mini-split retrofit take?
A single room often takes just one day. A whole-home multi-zone job usually runs two to three days from start to finish. That’s far faster and far cleaner than adding ductwork to an old house. Most of the time, you can stay home and go about your day while we work.